Hyderabadi Chicken Dum Biryani (Kacchi Style)
Hyderabadi Chicken Dum Biryani (Kacchi Style)

If you are reading this, you’re likely either hungry and could not resit gawking at a plateful of biryani.. or are on the same journey I was until now – the search for THE biryani. While we were pretty happy alternating between this and this, I knew I had to try the kacchi-style before I could put the quest to rest.

So here we are… with this lip-smacking adaptation of a recipe from someone who makes no attempt to hide his enthusiasm for the dish – the vahchef!

I’ve now made this so many times that there is no more doubt about it delivering the perfect blend of meat and rice with the flavors seeping through every grain. It’ll literally knock your socks off.. cause if you think about it, there’s no water added to cook the meat or the rice.. and the meat marinade is absolutely raw too. But what comes out of the oven is nothing short of perfection. The meat’s falling off the bone, the rice is irresistibly tasty and flavored simply by the steam rising from the bottom of the vessel all the way to the top. The sheer magic of dum.

I could go on rambling, but I’m pretty sure you get the picture. Just one more thing – you could make this in any heavy bottom pot, with a nice tight lid. But I do think the dutch oven was made just so we could make biryani in it! Don’t let the long list of ingredients put you off, it ain’t that hard once you figure out what you need (and memorizing it, but hey.. that’s why you should bookmark this post). If it were all that hard, why would this be the only way we make biryani now.. and every week at that? So please do me a favor and try it.. just once. You’ll be glad.
HAPPY 2016 y’all!
Hyderabadi Chicken Dum Biryani (Kacchi Style)
Based on Vah Chef’s Restaurant Style Chicken Biryani recipe
Serves: 7-8 | Prep Time: 20 minutes [marinate meat overnight or up to 2 days in advance, minimum 2 hrs ahead of cooking, soak rice for 1-2 hours before cooking] | Cooking Time: 50 minutes
Ingredients:
- 3.5 cups rice
- 3 lbs. chicken (large to medium size cuts of mixed pieces or leg and thigh works best)
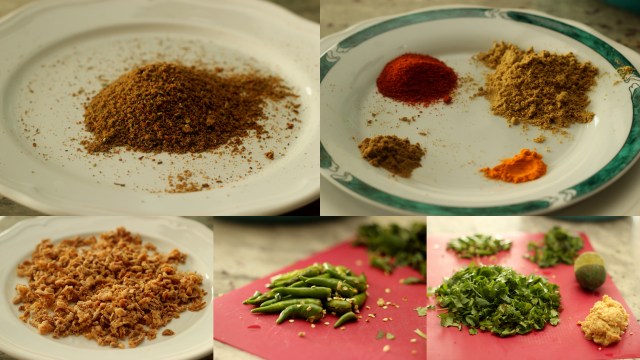
For the Biryani masala:
- 4 pieces of cinnamon sticks (approx. 1” each)
- 3 cardamoms
- 10 cloves
- 3/4 tsp peppercorns
- 2 mace pieces (javitri)
- 1 star anise
- 3-4 medium-sized bay leaves
- 1 tsp black cumin seeds (kala jeera)
- 1 tsp fennel seeds (saunf)
For the marinade:
- 2 Tbsp biryani masala (see recipe below, made using the ingredients listed in the section above)
- 1 Tbsp coriander powder
- 1 tsp red chili powder (adjust to taste, I added 1/4 extra)
- 1/2 tsp cumin powder
- 1/4 tsp turmeric powder (optional)
- 1/4 cup ginger and garlic paste
- 1 cup yogurt
- 24 Thai/Indian green chilies (i.e., 7 per cup of rice, adjust to taste)
- 1/2 cup fried onions (can use store-bought ones)
- 1/2 – 1 cup fresh cilantro, finely chopped
- 1/4 – 1/3 cup fresh mint, chopped
- juice of 1 lime (approx. 1 Tbsp)
- 3-4 Tbsp oil
- salt to taste
For the rice:
- 3 Tbsp oil
- 1 bay leaf
- 1 tsp black cumin seeds (kala jeera)
- salt to taste
For the layering:
- handful of cilantro leaves, finely chopped
- handful of fried onions
- 1 pinch of saffron soaked in 1/4 cup hot milk
- 1 Tbsp rose water (optional)
- 2-3 Tbsp ghee
Method:
Step 1: Make the Biryani Garam masala

Grind all the ingredients listed under “For the Biryani masala” into a mostly-fine powder.
Note: This makes a little more than 2 Tbsp and can be used as-is for this recipe. You can also make larger batches and store the excess in an airtight container in the freezer for 6-9 months.
Step 2: Marinate the chicken and soak the rice

- Marinate the chicken with all the ingredients listed under the marinade section.
- Check the taste to make sure the salt and spice are right, as this cannot be adjusted later during the cooking process.
- Set aside for at least 2 hours, or overnight in the fridge and bring it back to room temperature before proceeding to dum-cook the biryani. Note: The chicken can be marinated in any vessel, but before cooking transfer it to the bottom of the pot which you’ll be using for making the biryani, in a single layer if possible with the meaty side touching the bottom of the pan to allow for some charring.
- Soak the rice for 1-2 hours before cooking.
Step 3: Cook the rice and layer the biryani
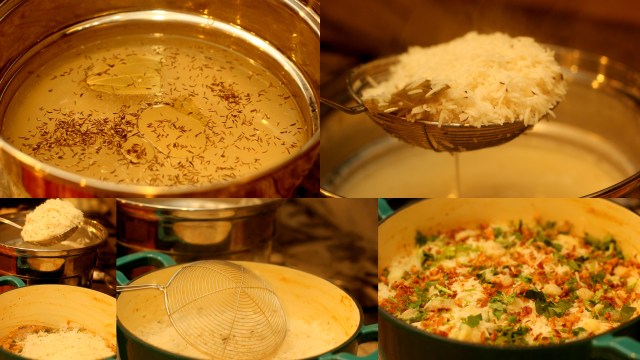
- Bring a large pot of water to a rolling boil. You need enough water to cook the rice (so 3-4 times the amount of rice).
- Add salt, oil, cumin seeds and bay leaves to season the water. Note: Salting the water might be the single most critical step to getting your biryani right, so taste it after adding all the ingredients and make sure the water is SALTY. Only then the rice will soak up the salty water and taste right in the biryani.
- Cook the rice in the boiling water for 4-5 minutes until it is about 70% done, stirring frequently and checking the grain for done-ness. The rice will continue to steam-cook and get done during the dum process.
- As soon as it is 70% done, turn off the heat and start removing the rice with a slotted ladle to drain off the water and add to the biryani pot on top of the meat marinade.
- Level the rice and slightly tap the pot to allow the rice layer to settle down.
- Sprinkle the fried onions and cilantro for the layering on top of the rice.
- Pour the saffron milk and rose water randomly over the top of the rice layer.
- Spoon the ghee on top of the rice layer, especially around the edges to allow it to seep through the layer.
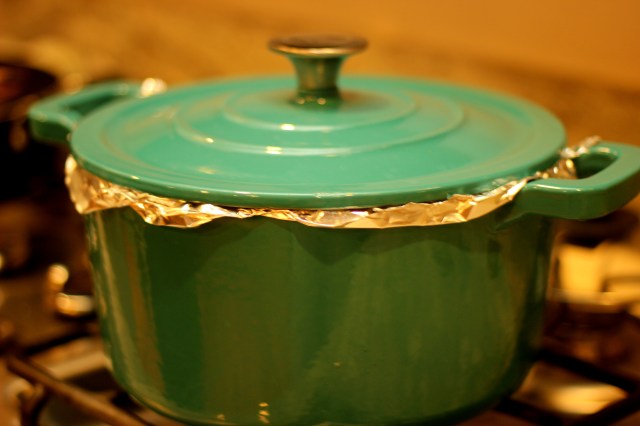
- Seal the pot with a layer of foil (or you can use the dough-seal process typically used as well) and put the lid on.
Step 4: Dum cook the biryani
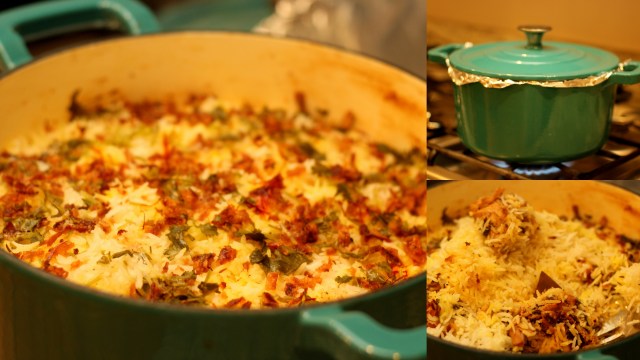
- To start with, cook the biryani on high flame directly on the stove for 13-15 minutes. This will initiate the cooking process, charring the meat slightly at the bottom-layer, and release enough steam to cook the layers of rice.
- After this, you can either transfer the biryani pot (if oven-safe) to a pre-heated oven at 375 F, and cook for 30 minutes there to finish the process.
- Or, you can continue to cook on dum by trasnferring the pot onto a girddle placed on the stove, on medium-low heat for another 25-30 minutes.
- Allow the biryani to rest for 10 minutes before opening to inspect.
- After opening, using a ladle gently pry through the layers from one corner to check the meat at the very bottom. It should be slightly browned, and well done. There will also be no moisture (or very little gravy coating the meat).
- To serve, carefully alternate between the layers from the very bottom of the pot with the rice on top.
Serve with raita and/or salan and some boiled eggs to go with your restaurant-style hyderabadi biryani!


Please tell me what capacity of dutch oven you use for this recipe (in qts or liters). thanks
Can I substitute the chicken with lamb? Do I have to make any adjustments?
Awesome recipe! I made this with only a few modifications. I cooked my biryani in a Dutch oven over coals and cooked the chicken for 15-20 mins before adding the rice.
Hello
I am not a great cook. It will be my first time ever making biriyani. When I read the recepie I can smell it.I have not made it yet. Can you tell me what is the weight of the cup you mean, is it 200 or 250grams. Is it regular tea cup
Cooked Briyani for the first time using this recipe and it was a hit! Dad won’t stop complimenting it!!
Absolutely loved it. Thank you so much for the recipe
Hi aish
What type of pot is this one in which you have cooked the biriyani??? I am planning on buying one.. where can I get them
I guess it’s a Le Creuset pot made of cast Iron. Any cast iron pot will do the same job. Doesn’t has to be Le Creuset which is super expensive. A cheaper one can be found in IKEA.
Hi! What size dutch oven is this? Can we halve the recipe?
Very nice recipe !!! Please let me know what can I substitute the yogurt with as my husband don’t eat yogurt.
I’ve skipped yogurt once to accommodate a lactose intolerant new baby’s mommy and it was still super yum!!
Great recipie. Will try it for sure :). Please post a recipie for veggie biryani ( with lots of vegetables) as well.
Thanks!
I absolutely love Hyderabadi chicken biryani (I even have a post) and yours look so elaborate and wonderful. I smell the fragrance of your rice as I am reading the ingredients. This is a good one, Aish! Yum!
Super Duper awesomeness personified.Biriyani redefined.